
Hi sugar tartes! It a fabulous winter's day here in North Carolina! The birds are chirping, the sun is beaming through my windows and the warmth of my hot cocoa is warming my fingertips.
Some of you may remember Charity, whom I began this blog with. Remember she sells the AMAZING dolls that I featured here. She also sells patterns here. They are all simple, easy to follow and they're great because they are made by her :)
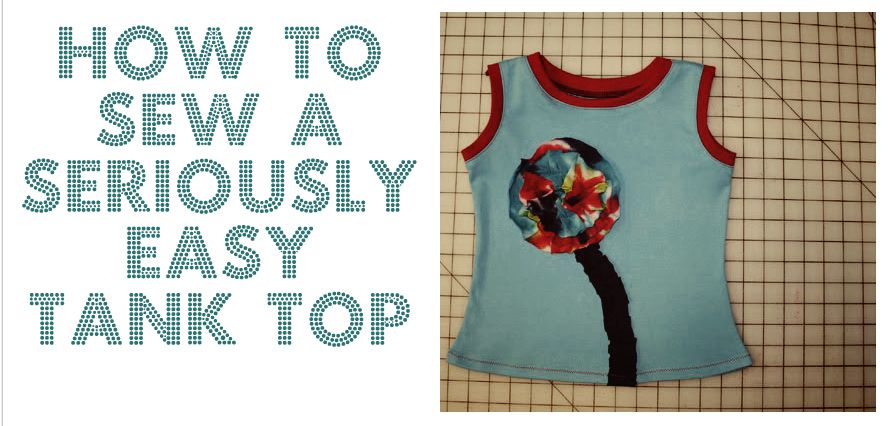
She had written up a tutorial for her SERIOUSLY? EASY TANK TOP, that makes the pattern into a standard tank, and I am sharing it with you all today. I actually had this post started over a year ago, but I must have forgotten it, and left it in the drafts. Better late than never? Here it is now...

Cut strips of stretchy knit fabric (like jersey or rib knit) 4" long. I usually cut the strips as wide as I can using the entire width of the fabric.

Fold your 4" strips in half, making them 2". Match the raw edges of the strips with the raw edge of one of the the arm openings in your tank top front piece. Pin down all the way accross the arm opening. Once all the way accross trim off what is left to use on the next arm opening!


Go to your machine and stitch in place. I then serge the raw edges, if you do not have access to a serger no problem... just either zigzag or overcast stitch the raw edges with your sewing machine. NOTE... knit fabrics normally do not fray... so if you choose you can leave your edges raw as well! :-)


Now off to the sewing machine again... now you will need to top stitch your seam down... this makes for a much neater and more professional finished look!


Follow these steps with all arm and both neck and bottom openings. Now you will follow all instructions that came in your pattern to construct your top. I have decided to show you another option also... I am going to simply hem the bottom of this tank top instead of using our red band of fabric on the bottom...

I serged the bottom first, all the way around. Next, I folded up 1/2" all the way around. Now Press, and go to the sewing machine! Sew with either a zigzag or a straight stitch (its all in what you like the look of better) And your finshed!


The flower on this tank top was a lot of fun too... I just used strips of a t-shirt that I was using when making a matching skirt! Runched the strips up and stitched on!
Don't forget, you can find Charity's patterns over at her Big Cartel Shop, TheVinesBranches.com

Some of you may remember Charity, whom I began this blog with. Remember she sells the AMAZING dolls that I featured here. She also sells patterns here. They are all simple, easy to follow and they're great because they are made by her :)
She had written up a tutorial for her SERIOUSLY? EASY TANK TOP, that makes the pattern into a standard tank, and I am sharing it with you all today. I actually had this post started over a year ago, but I must have forgotten it, and left it in the drafts. Better late than never? Here it is now...
Cut strips of stretchy knit fabric (like jersey or rib knit) 4" long. I usually cut the strips as wide as I can using the entire width of the fabric.
Fold your 4" strips in half, making them 2". Match the raw edges of the strips with the raw edge of one of the the arm openings in your tank top front piece. Pin down all the way accross the arm opening. Once all the way accross trim off what is left to use on the next arm opening!
Go to your machine and stitch in place. I then serge the raw edges, if you do not have access to a serger no problem... just either zigzag or overcast stitch the raw edges with your sewing machine. NOTE... knit fabrics normally do not fray... so if you choose you can leave your edges raw as well! :-)
Now off to the sewing machine again... now you will need to top stitch your seam down... this makes for a much neater and more professional finished look!
Follow these steps with all arm and both neck and bottom openings. Now you will follow all instructions that came in your pattern to construct your top. I have decided to show you another option also... I am going to simply hem the bottom of this tank top instead of using our red band of fabric on the bottom...
I serged the bottom first, all the way around. Next, I folded up 1/2" all the way around. Now Press, and go to the sewing machine! Sew with either a zigzag or a straight stitch (its all in what you like the look of better) And your finshed!
The flower on this tank top was a lot of fun too... I just used strips of a t-shirt that I was using when making a matching skirt! Runched the strips up and stitched on!
Don't forget, you can find Charity's patterns over at her Big Cartel Shop, TheVinesBranches.com







 Posts
Posts


